Uyuni: Configuration management, patch management, and infrastructure installation and management Tool
As a passionate DevOps Engineer with 3+ years of experience, I specialize in building robust, scalable, and secure infrastructures. My expertise spans Kubernetes, Jenkins, Docker, AWS, Ansible, Flask, Apache, Nginx, Kibana, Uyuni, Percona PMM, MySQL, and more.
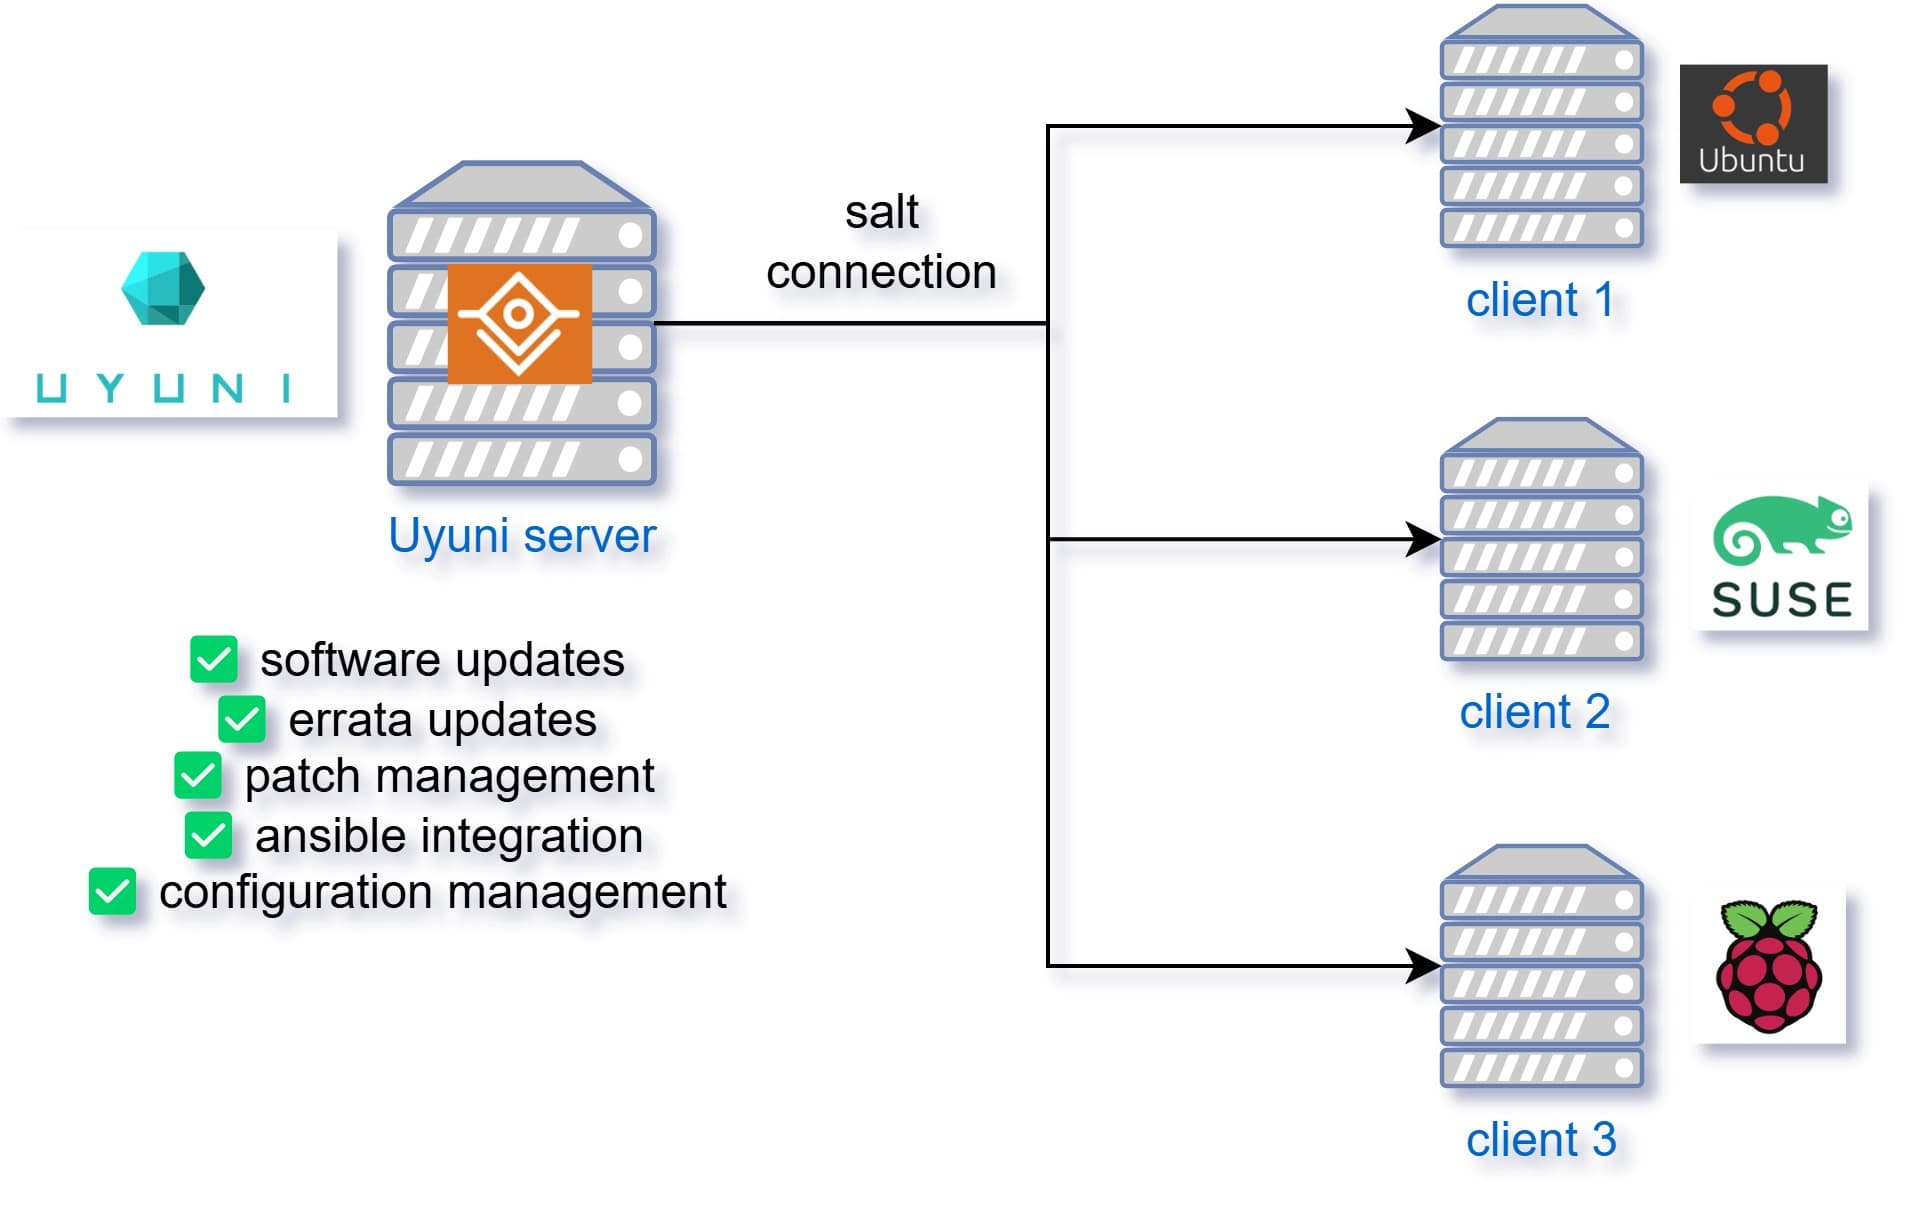
This article explains how to install and manage Uyuni on openSUSE Leap Micro 5.5 and above. The purpose of setting up Uyuni is primarily for patch management, configuration management, and integrating Ansible control. Uyuni serves as a centralized management tool, ensuring systems are up-to-date and compliant with organizational standards.
Prerequisites
Operating System: openSUSE Leap Micro 5.5 or higher
RAM: 16GB
CPU: 4 cores
Storage: 1000GB
Installation of Uyuni Server on openSUSE
1. Preparation
- Login as
rootand run:
hostnamectl set-hostname uyuni.q21.in
transactional-update shell
2. Add Uyuni Repository
zypper ar https://download.opensuse.org/repositories/systemsmanagement:/Uyuni:/Stable/images/repo/Uyuni-Server-POOL-$(arch)-Media1/ uyuni-server-stable
zypper ref
3. Install Uyuni Packages
zypper in mgradm mgrctl mgradm-bash-completion mgrctl-bash-completion uyuni-storage-setup-server
transactional-update
4. Reboot Server
Reboot the server as Uyuni requires a restart to apply changes on Leap Micro.
Installing Podman
After reboot, log in root and install Podman:
sudo mgradm install podman
Uyuni is now installed. Access the UI via your browser and set up admin user.
Ports Used by Uyuni
80: HTTP
443: HTTPS
4505: Salt Communication
4506: Salt Communication
Setting Up Repositories
Why This Is Needed
Setting up repositories is essential to ensure that client systems receive the appropriate packages and updates. This is particularly useful for patch management and configuration management. Additionally, it integrates well with Ansible control systems, allowing for seamless configuration automation.
Diagram: Uyuni Server Installation Process
   +----------------+       +----------------------+        +----------------+
   | OpenSUSE Leap  | ----->| Add Uyuni Repository | ----->  | Install Uyuni  |
   | Micro 5.5      |       |   using Zypper       |         | Packages &     |
   |                |       |                      |         | Podman         |
   +----------------+       +----------------------+        +----------------+
Login to Uyuni dashboard:
Softwares > Manage > Channel > Create a ChannelEnable repositories via command:
podman ps
podman exec -it <container-id> sh
- To list the available repos
spacewalk-common-channels -l
- Add Ubuntu 22.04 repos:
syntax:
spacewalk-common-channels \
<base_channel_label> \
<child_channel_label_1> \
<child_channel_label_2> \
... <child_channel_label_n>
command:
spacewalk-common-channels -u *** -p '***' -a amd64-deb \
ubuntu-2204-pool-amd64-uyuni ubuntu-2204-amd64-main-uyuni \
ubuntu-2204-amd64-main-updates-uyuni ubuntu-2204-amd64-main-security-uyuni \
ubuntu-2204-amd64-uyuni-client

You can go to channels and sync the repositories.
Installing venv-salt-minion on Ubuntu Clients

- Clear machine ID if duplicated:
cat /dev/null > /etc/machine-id
sudo systemd-machine-id-setup
- Remove existing salt-minion service:
sudo rm -rf /etc/salt/minion_id
sudo rm -rf /var/cache/venv-salt-minion/minion
sudo rm -rf /etc/salt/minion.d/*
systemctl stop salt-minion
- Add repository and install:
wget -qO - https://download.opensuse.org/repositories/systemsmanagement:/Uyuni:/Stable:/Ubuntu2204-Uyuni-Client-Tools/xUbuntu_22.04/Release.key | sudo apt-key add -

vim /etc/apt/sources.list
Add this line:
deb https://download.opensuse.org/repositories/systemsmanagement:/Uyuni:/Stable:/Ubuntu2204-Uyuni-Client-Tools/xUbuntu_22.04/ ./
- Install
venv-salt-minion:
apt update
apt install venv-salt-minion
systemctl enable venv-salt-minion
- Start and restart service:
systemctl start salt-minion
systemctl restart salt-minion
Configuration
Edit configuration file:
vim /etc/venv-salt-minion/minion
Add:
master: ***.q21.in
grains:
  susemanager:
    activation_key: "fg12***df43"
server_id_use_crc: adler32
enable_legacy_startup_events: False
enable_fqdns_grains: False
Changing SSL Certificates
To use your SSL certificates:
for f in root-cert.pem cert.pem private.key; do
  mgrctl cp $f server:/tmp
done

mgrctl exec -ti -- mgr-ssl-cert-setup --root-ca-file=/tmp/root-cert.pem --server-cert-file=/tmp/cert.pem --server-key-file=/tmp/private.key
Ansible Playbook for venv-salt-minion Installation
- name: Install and configure venv-salt-minion on Ubuntu 22.04
  hosts: all
  become: yes
  serial: 1
  tasks:

  - name: Clear /etc/machine-id
    command: cat /dev/null > /etc/machine-id

  - name: Regenerate machine-id
    command: systemd-machine-id-setup

  - name: Remove old Salt minion configs
    file:
      path: "{{ item }}"
      state: absent
    loop:
    - /etc/salt/minion_id
    - /var/cache/venv-salt-minion/minion
    - /etc/salt/minion.d/

  - name: Add Uyuni repo key
    apt_key:
      url: https://download.opensuse.org/repositories/systemsmanagement:/Uyuni:/Stable:/Ubuntu2204-Uyuni-Client-Tools/xUbuntu_22.04/Release.key
      state: present

  - name: Add Uyuni repo to sources list
    apt_repository:
      repo: deb https://download.opensuse.org/repositories/systemsmanagement:/Uyuni:/Stable:/Ubuntu2204-Uyuni-Client-Tools/xUbuntu_22.04/ ./
      state: present

  - name: Update APT cache
    apt:
      update_cache: yes

  - name: Install venv-salt-minion
    apt:
      name: venv-salt-minion
      state: present

  - name: Enable venv-salt-minion service
    systemd:
      name: venv-salt-minion
      enabled: yes

  - name: Configure venv-salt-minion
    blockinfile:
      path: /etc/venv-salt-minion/minion
      create: yes
      block: |
        master: ***.q21.in
        grains:
          susemanager:
            activation_key: "fg12***df43"
        server_id_use_crc: adler32
        enable_legacy_startup_events: False
        enable_fqdns_grains: False

  - name: Start venv-salt-minion service
    systemd:
      name: venv-salt-minion
      state: started

  - name: Wait for 2 minutes
    pause:
      minutes: 2

  - name: Restart venv-salt-minion service
    systemd:
      name: venv-salt-minion
      state: restarted
Registering Clients with Uyuni
To register Ubuntu clients with Uyuni:
Create Activation Keys:
Go to
Systems > Activation Keys > Create Key.Enter a description and select the desired channels.
Register the Client:
use previous steps to register the uyuni clients and accept the keys from UI under salt section.
Verify Registration:
Check the Uyuni UI under
Systems > Systems List.Ensure the client appears and is properly assigned to the activation key.
The client registration process allows Ubuntu systems to receive patches and configuration changes via Uyuni, ensuring centralized management.

Best Practices
Regularly Update Uyuni Server: Ensure your Uyuni server is up-to-date to avoid security vulnerabilities.
Use Activation Keys Efficiently: Pre-define activation keys to automate client registration.
Monitor Logs Frequently: Review logs for errors and unusual behavior.
Backup Configurations: Regularly backup configuration files to avoid data loss during updates.
Test Changes: Test new configurations on a non-production environment before applying to production servers.
Additional Resources
My Links
Conclusion
In this guide, we have covered the installation and configuration of Uyuni on openSUSE Leap Micro. We explained the purpose of setting up Uyuni for patch management, configuration management, and Ansible control integration. Additionally, we went through the processes of setting up repositories, installing venv-salt-minion on Ubuntu clients, configuring SSL certificates, and registering clients. Following the best practices mentioned will ensure a smoother operation of Uyuni in your infrastructure.
If you need any help or have questions, feel free to ask! 😊